Docker Engine Binary 직접 빌드하기
docker CE(Community Edition) 제품을 통해 Docker 를 직접 빌드하는 방법을 알아본다.
(Dockerfile 을 이용한 image build 가 아니다. docker 제품 자체를 빌드하려는 것이다.)
먼저 도커의 소스 관리 체계에 관한 이전 글을 읽어보고 오는 것이 좋겠다.
docker-ce repository 를 먼저 살펴보자.
이 repository 는 Docker, Inc. 에 의해 관리되고 있는데 Docker CE 라는 제품의 host component 라고 부른다.
이는 docker-ce 라는 제품을 빌드하기 위한 공간으로, 그 안에는 또 다시 다른 많은 upstream component 들을 모아두었다.
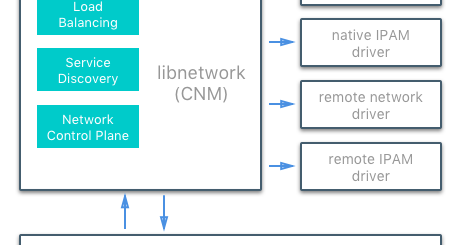
즉, docker-ce 를 빌드하기 위해서는 여러가지 component 들이 필요한데(libnetwork, containerd, runc 등), 이러한 component 들은 제 각기 별도로 분리된 프로젝트 들이다.
docker-ce 의 master branch 에는 이러한 다양한 upstream component 들의 코드가 주기적으로 merge 된다.
(moby-components tool 에 의해 자동화되어 있다.)
제품을 release 할 때는 YY.MM 의 이름으로 신규 branch 가 생성되어 빌드된 후 DockerHub 등에 패키지가 제공된다.

This repository hosts open source components of Docker CE products. The
https://github.com/docker/docker-cemasterbranch serves to unify the upstream components on a regular basis. Long-lived release branches host the code that goes into a product version for the lifetime of the product.
This repository is solely maintained by Docker, Inc.
Themasterbranch is a combination of components adapted from different upstream git repos into a unified directory structure using the moby-components tool.
Main development of new features should be directed towards the upstream git repos. Themasterbranch of this repo will periodically pull in new changes from upstream to provide a point for integration.
When a release is started for Docker CE, a new branch will be created frommaster. Branch names will beYY.MMto represent the time-based release version of the product, e.g.17.06.
docker-ce 에는 크게 3 가지 component 가 포함되어 있다.
- cli : docker CLI 용 component (빌드하면 docker binary 가 생성됨)
- engine : docker engine 용 component (하위에 docker engine 을 구성하는 다양한 component 들이 포함됨)
- packaging : docker-ce packaging 을 위한 component
docker-ce 를 빌드할 때는 cli 와 engine 을 각각 별도로 하는 방법도 있고, packaging component 를 이용하여 전체를 한번에 빌드하는 방법도 있다.
docker 를 빌드하다 보면 특이한 점이 있는데, docker build 중에도 docker 를 사용한다는 것이다.
즉, docker container 를 만들어서 그 안에서 빌드 환경을 만들고 컴파일을 수행한다.
그렇게 만들어진 binary 는 container 기동 시 제공한 volume 영역에 저장되어 빌드를 마친 후에는 host 에서 사용할 수 있게 해준다.
참 환상적인 아이디어인 것 같다.
임시로 container 를 만들어서 하고 싶은 일을 하고 결과물만 host 에서 사용할 수 있게 한다는 것 !
이렇게 하면 host 에 빌드 시 필요한 자질구레한 tool 들을 설치할 필요도 없지 않은가?
이를 확인하기 위해 docker-ce component 중에서 cli component 만 빌드해본다.
docker-ce 소스를 git clone 으로 받은 후, cli 디렉토리에서 다음을 수행하면 된다. (README.md 파일 참조)
$ git clone https://github.com/docker/docker-ce.git
$ cd docker-ce/components
$ cd cli
$ make -f docker.Makefile binary
빌드를 시험한 OS 환경은 Centos7 이다.
make 를 수행하면 크게 다음의 2 가지 과정으로 빌드를 수행한다.
- cli/dockerfiles/Dockerfile.binary-native 를 이용하여 docker-cli-native image 를 빌드한다.
(docker build 를 통해 image 안에 컴파일 시 필요한 tool 들을 모두 설치하고 환경 변수를 설정해준다.) - 생성한 docker-cli-native image 를 이용하여 container 를 기동하여 자동으로 빌드를 수행한다.
이 때 결과물은 host 에서 사용할 수 있도록 volume 옵션을 사용한다.
(container 기동과 동시에 scripts/build/binary 스크립트를 실행)
cli/dockerfiles/Dockerfile.binary-native 내용은 아래와 같이 간단하다.
- golang image 를 pull 해서
- git, bash, coreutils, gcc 등을 설치하고
- 환경 변수 셋팅해두고
- image 내의 workdir 을 /go/src/github.com/docker/cli 로 설정해둔 후
- 실제 container 를 기동할 때는 ./scripts/build/binary 를 실행
ARG GO_VERSION=1.12.9

FROM    golang:${GO_VERSION}-alpine

RUN     apk add -U git bash coreutils gcc musl-dev

ENV     CGO_ENABLED=0 \
        DISABLE_WARN_OUTSIDE_CONTAINER=1
WORKDIR /go/src/github.com/docker/cli
CMD     ./scripts/build/binary
scripts/build/binary 는 아래와 같이 go language 로 코드를 빌드하는 스크립트이다.
빌드 후 생기는 binary(내 환경에서는 docker-linux-amd64)를 docker 라는 이름으로 symbolic link 를 스크립트에서 걸어준다.
#!/usr/bin/env bash
#
# Build a static binary for the host OS/ARCH
#

set -eu -o pipefail

source ./scripts/build/.variables

echo "Building statically linked $TARGET"
export CGO_ENABLED=0

# go language 를 이용하여 빌드한다.
go build -o "${TARGET}" --ldflags "${LDFLAGS}" "${SOURCE}"

# 생성된 binary 를 docker 라는 이름으로 symbolic link 를 걸어둔다.
ln -sf "$(basename "${TARGET}")" build/docker
아래는 빌드 과정에서 화면에 뿌려지는 내용이다.
위의 내용을 이해했다면 아래 로그를 보는 것이 어렵지 않을 것이다.
맨 끝의 docker run 수행 시 -v 옵션을 준 것에 유의하자.
이는 이미 언급했듯이 container 내에서의 빌드 결과를 host 에서 사용할 수 있게 하기 위한 것이다.
docker 사용자 입장에서는 당연하고 간단한 기능을 이용한 것이지만, 빌드에서 이를 응용했다는 것이 너무나 아름다운 아이디어이지 않은가?
[root@dpleevbox cli]# make -f docker.Makefile binary
# build dockerfile from stdin so that we don't send the build-context; source is bind-mounted in the development environment
cat ./dockerfiles/Dockerfile.binary-native | docker build --build-arg=GO_VERSION -t docker-cli-native -
Sending build context to Docker daemon  2.048kB
Step 1/6 : ARG GO_VERSION=1.12.9
Step 2/6 : FROM    golang:${GO_VERSION}-alpine
1.12.9-alpine: Pulling from library/golang
9d48c3bd43c5: Pull complete
7f94eaf8af20: Pull complete
9fe9984849c1: Pull complete
cf0db633a67d: Pull complete
0f7136d71739: Pull complete
Digest: sha256:e0660b4f1e68e0d408420acb874b396fc6dd25e7c1d03ad36e7d6d1155a4dff6
Status: Downloaded newer image for golang:1.12.9-alpine
 ---> e0d646523991
Step 3/6 : RUN     apk add -U git bash coreutils gcc musl-dev
 ---> Running in b9d9235ce8b5
fetch http://dl-cdn.alpinelinux.org/alpine/v3.10/main/x86_64/APKINDEX.tar.gz
fetch http://dl-cdn.alpinelinux.org/alpine/v3.10/community/x86_64/APKINDEX.tar.gz
(1/24) Installing ncurses-terminfo-base (6.1_p20190518-r0)
(2/24) Installing ncurses-terminfo (6.1_p20190518-r0)
(3/24) Installing ncurses-libs (6.1_p20190518-r0)
(4/24) Installing readline (8.0.0-r0)
(5/24) Installing bash (5.0.0-r0)
Executing bash-5.0.0-r0.post-install
(6/24) Installing libacl (2.2.52-r6)
(7/24) Installing libattr (2.4.48-r0)
(8/24) Installing coreutils (8.31-r0)
(9/24) Installing binutils (2.32-r0)
(10/24) Installing gmp (6.1.2-r1)
(11/24) Installing isl (0.18-r0)
(12/24) Installing libgomp (8.3.0-r0)
(13/24) Installing libatomic (8.3.0-r0)
(14/24) Installing libgcc (8.3.0-r0)
(15/24) Installing mpfr3 (3.1.5-r1)
(16/24) Installing mpc1 (1.1.0-r0)
(17/24) Installing libstdc++ (8.3.0-r0)
(18/24) Installing gcc (8.3.0-r0)
(19/24) Installing nghttp2-libs (1.39.2-r0)
(20/24) Installing libcurl (7.65.1-r0)
(21/24) Installing expat (2.2.7-r0)
(22/24) Installing pcre2 (10.33-r0)
(23/24) Installing git (2.22.0-r0)
(24/24) Installing musl-dev (1.1.22-r3)
Executing busybox-1.30.1-r2.trigger
OK: 128 MiB in 39 packages
Removing intermediate container b9d9235ce8b5
 ---> 3cb90225a53c
Step 4/6 : ENV     CGO_ENABLED=0         DISABLE_WARN_OUTSIDE_CONTAINER=1
 ---> Running in bf444545a9a1
Removing intermediate container bf444545a9a1
 ---> 366a6b8c38d2
Step 5/6 : WORKDIR /go/src/github.com/docker/cli
 ---> Running in df89bb316d2d
Removing intermediate container df89bb316d2d
 ---> e71b9cf83a6d
Step 6/6 : CMD     ./scripts/build/binary
 ---> Running in c8ab4f47a46f
Removing intermediate container c8ab4f47a46f
 ---> 35dafabd5875
Successfully built 35dafabd5875
Successfully tagged docker-cli-native:latest
docker run --rm -e VERSION=19.09.0-dev -e GITCOMMIT -e PLATFORM -e TESTFLAGS -e TESTDIRS -e GOOS -e GOARCH -e GOARM -v "/home/dplee/work/docker-ce/components/cli":/go/src/github.com/docker/cli -v "docker-cli-dev-cache:/root/.cache/go-build"  docker-cli-native
Building statically linked build/docker-linux-amd64
[root@dpleevbox cli]# cd build/
[root@dpleevbox build]# ls
docker  docker-linux-amd64
[root@dpleevbox build]# ls -al
합계 64120
drwxr-xr-x.  2 root root       46  9월  6 05:48 .
drwxr-xr-x. 21 root root     4096  9월  6 05:48 ..
lrwxrwxrwx.  1 root root       18  9월  6 05:48 docker -> docker-linux-amd64
-rwxr-xr-x.  1 root root 65652250  9월  6 05:48 docker-linux-amd64
위처럼 빌드가 잘 끝난 후 Host 의 docker-ce/components/cli/build 디렉토리를 보면 docker-linux-amd64 라는 binary 가 생긴 것을 볼 수 있다.
이 파일이 docker 라는 symbolic link 로 걸려 있다.
이 것이 우리가 docker CLI 로 사용하는 docker binary 이다.
[root@dpleevbox build]# ./docker version
Client:
 Version:           19.09.0-dev
 API version:       1.40
 Go version:        go1.12.9
 Git commit:
 Built:             Thu Sep  5 20:47:20 2019
 OS/Arch:           linux/amd64
 Experimental:      false

Server: Docker Engine - Community
 Engine:
  Version:          19.03.2
  API version:      1.40 (minimum version 1.12)
  Go version:       go1.12.8
  Git commit:       6a30dfc
  Built:            Thu Aug 29 05:27:34 2019
  OS/Arch:          linux/amd64
  Experimental:     false
 containerd:
  Version:          1.2.6
  GitCommit:        894b81a4b802e4eb2a91d1ce216b8817763c29fb
 runc:
  Version:          1.0.0-rc8
  GitCommit:        425e105d5a03fabd737a126ad93d62a9eeede87f
 docker-init:
  Version:          0.18.0
  GitCommit:        fec3683
빌드가 완료된 후 host 의 docker image 상태를 확인해보자.
아래와 같이 빌드 시 pull 했던 golang image 와 빌드 환경을 위해 만들었던 docker-cli-native image 가 남아 있는 것을 볼 수 있다.
[root@dpleevbox cli]# docker images
REPOSITORY          TAG                 IMAGE ID            CREATED             SIZE
docker-cli-native   latest              35dafabd5875        2 hours ago         471MB
golang              1.12.9-alpine       e0d646523991        2 weeks ago         350MB
engine 을 빌드할 때도 개념은 유사하기 때문에 따로 언급할 것은 없다.
docker-ce/components/engine 디렉토리에서 make 만 수행하면 된다.
그러면 docker-ce/components/engine/bundles/binary-daemon 디렉토리에 빌드된 binary 들이 생길 것이다.
cli 와의 차이점이라면, engine 빌드 시에는 하위에 다른 많은 component 들이 필요하기 때문에 upstream component 들까지 모두 빌드한다는 것이다.
'도커 컨테이너 까보기(3) – Docker Process, Binary' 에서 자세히 살펴보았지만, dockerd 나 containerd, runc 등의 binary 들은 모두 이 engine component 를 빌드하면 결과로 나오는 것들이다.
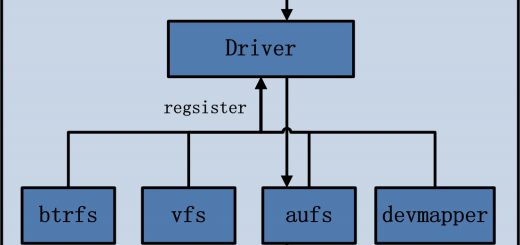
이미 도커의 소스 관리 체계 에서 말했지만, containerd, runc, 기타 많은 driver 및 pluggable component 들이 각자 개별적으로 개발되지만 결국 모두 docker engine 을 구성하기 위한 레고 블럭같은 것이다.
packaging component 를 통해 cli 와 engine 을 한꺼번에 빌드하는 것도 무척 쉽다.
다만 차이점이라면 make rpm, make static, make deb 와 같이 수행하여, 빌드의 결과물 타입을 rpm 패키지나 tar.gz 같은 것으로 지정할 수 있다는 것이다.
이처럼 docker 의 빌드 환경은 무척이나 직관적으로 간단하게 수행할 수 있지만, 인터넷이 되어야 하고 docker 가 설치되어 있는 환경이 필수적인 것 같다.