GNU 빌드시스템 (2)
자~ 세상에서 가장 간단한 GNU 빌드시스템을 만들어볼까요 ?
아래 시스템에서 시험했습니다.
[$] uname -a
Linux smurf 2.6.32-220.el6.x86_64 #1 SMP Tue Dec 6 19:48:22 GMT 2011 x86_64 x86_64 x86_64 GNU/Linux
1.
다음과 같이 hello.c 파일을 만듭니다. 어떤 내용이든 상관없습니다.
#include <stdio.h>

int main()
{
    printf("hello\n");
}
2.
configure.in 파일을 다음과 같이 작성합니다.
dnl configure.in sample     -> 주석

AC_PREREQ(2.59)

AC_INIT([hello], [1.0], [cloudrain21@gmail.com])  -> 프로그램명, 버전, 이메일주소

AM_INIT_AUTOMAKE([1.9 foreign])

AC_PROG_CC

AC_CONFIG_FILES([Makefile])
AC_OUTPUT
3.
Makefile.am 파일을 다음과 같이 작성합니다.
bin_PROGRAMS = hello      -> bin 디렉토리에 만들 실행파일 이름
hello_SOURCES = hello.c   -> hello 실행파일을 만들 때 필요한 source 파일
hello_LDADD =             -> 빌드 시 필요한 라이브러리
4.
configure 파일을 만들기 위해 다음의 과정을 수행합니다.
가. aclocal 수행
나. autoconf 수행
[$] aclocal
[$] ls
Makefile.am  aclocal.m4  autom4te.cache/  configure.in  hello.c
[$] autoconf
[$] ls
Makefile.am  aclocal.m4  autom4te.cache/  configure*  configure.in  hello.c
신기하게도 우리가 많이 보던 configure 파일이 생성되었네요? ㅎㅎ
aclocal 은 일단 configure 파일을 만들때 필요한 내용이 들어있는 m4 파일을 생성한다고만 알아둡시다.
5.
Makefile.in 을 만들어내기위해 automake 를 수행합니다.
[$] automake
configure.in:7: required file `./install-sh' not found
configure.in:7:   `automake --add-missing' can install `install-sh'
configure.in:7: required file `./missing' not found
configure.in:7:   `automake --add-missing' can install `missing'
Makefile.am: required file `./depcomp' not found
Makefile.am:   `automake --add-missing' can install `depcomp'
실행해보니 install-sh 파일 등이 없다고 나오면서 automake시 --add-missing 옵션을 사용하라고 나오는군요. 해봅시다.
[$] automake --add-missing
configure.in:7: installing `./install-sh'
configure.in:7: installing `./missing'
Makefile.am: installing `./depcomp'
[$] ls
Makefile.am  aclocal.m4       config.log  configure.in  install-sh@
Makefile.in  autom4te.cache/  configure*  depcomp@   hello.c   missing@
오우~ 자동으로 필요한 파일들이 생기고 Makefile.in 파일도 생겼네요.
6.
드디어 configure 를 해봅니다.
[$] ./configure
checking for a BSD-compatible install... /usr/bin/install -c
checking whether build environment is sane... yes
checking for a thread-safe mkdir -p... /bin/mkdir -p
checking for gawk... gawk
checking whether make sets $(MAKE)... yes
checking for gcc... gcc
checking for C compiler default output file name... a.out
checking whether the C compiler works... yes
checking whether we are cross compiling... no
checking for suffix of executables...
checking for suffix of object files... o
checking whether we are using the GNU C compiler... yes
checking whether gcc accepts -g... yes
checking for gcc option to accept ISO C89... none needed
checking for style of include used by make... GNU
checking dependency style of gcc... gcc3
configure: creating ./config.status
config.status: creating Makefile
config.status: executing depfiles commands
[$] ls
Makefile     Makefile.in  autom4te.cache/  config.status*  configure.in  install-sh@
Makefile.am  aclocal.m4   config.log       configure*      depcomp@    hello.c    missing@
와우~ Makefile 이 자동으로 생성되었습니다.
빌드 시에 우리가 결국 필요로 하는 파일이 Makefile 아니겠어요 ?
그리고, configure 를 수행했을 때의 상태그대로를 재활용하고자할 경우를 위해 생성되는 config.status 와 configure 시의 trace log 를 기록해둔 config.log 파일도 생성되었음을 볼 수 있습니다.
7.
make 를 통해 컴파일을 해봅시다.
[$] make
gcc -DPACKAGE_NAME=\"hello\" -DPACKAGE_TARNAME=\"hello\" -DPACKAGE_VERSION=\"1.0\" -DPACKAGE_STRING=\"hello\ 1.0\" -DPACKAGE_BUGREPORT=\"cloudrain21@gmail.com\" -DPACKAGE=\"hello\" -DVERSION=\"1.0\" -I.     -g -O2 -MT hello.o -MD -MP -MF .deps/hello.Tpo -c -o hello.o hello.c
mv -f .deps/hello.Tpo .deps/hello.Po
gcc  -g -O2   -o hello hello.o
[$] ls
Makefile     aclocal.m4       config.status*  depcomp@  hello.o
Makefile.am  autom4te.cache/  configure*   &nb
sp;  hello*    install-sh@
Makefile.in  config.log       configure.in    hello.c   missing@
[$] ./hello
hello
[$] make install
make[1]: Entering directory `/home/bitmyer/tmp/gnu_build_2'
test -z "/usr/local/bin" || /bin/mkdir -p "/usr/local/bin"
  /usr/bin/install -c hello '/usr/local/bin'
/usr/bin/install: cannot create regular file `/usr/local/bin/hello': 허가 거부
make[1]: *** [install-binPROGRAMS] 오류 1
make[1]: Leaving directory `/home/bitmyer/tmp/gnu_build_2'
make: *** [install-am] 오류 2
make install 할 때는 default directory 인 /usr/local 쪽으로 install 하려다가 실패했습니다.
이는 configure 할 때 --prefix=/home/cloudrain21/local 과 같이 변경가능하겠죠. ^^
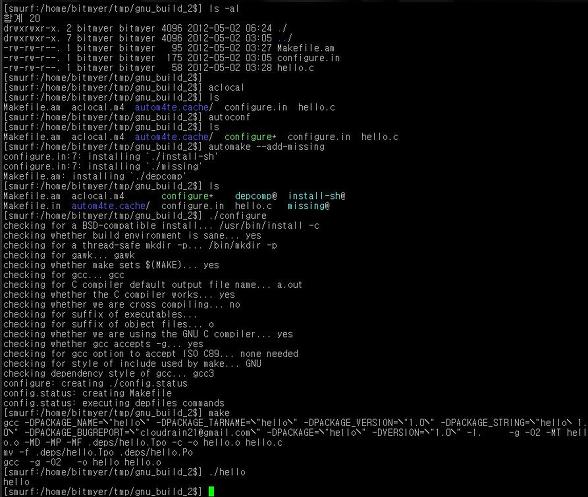
다음은 위의 과정을 한번에 수행해본 결과 이미지입니다.
자~ 이제 하나의 초간단 프로젝트를 자동 빌드하는 법을 배워봤습니다.
다음번에는 위의 초간단 빌드시스템에 대한 이해를 좀 해보도록 하죠.
그런 후 조금더 복잡한 경우에 대한 빌드시스템을 만들어 봅시다.
shared library 를 만든다거나 여러 모듈을 하나의 프로젝트로 구성하는 법 등... 위보다는 복잡한 경우들이 많이 있겠죠 ?